


- Category: Campervan
- Written by Paul Chubb
- Hits: 601
How to add a third bed to a campervan

One of the things that is a benefit in a camper van or caravan over most other camping alternatives is the provision of more sophisticated beds. Most camper vans have either a double bed in a permanent place or built in bench seats and table that convert to a double. In addition they may have, depending on the size of the van, bunks or other single beds. In this article I will describe how I added a third berth to Tin Lizzy.
Tin Lizzy is a Hiace Commuter, the largest of the of the Hiaces, but even so, it is a struggle to place a third berth without impacting some other required feature, a Hiace is just too compact for this not to be a struggle.
There are a range of Hiace campers that have had their roofs removed and replaced with a high fibre glass shell. These are often called “High Top” hiaces. This adds head room allowing you to stand up and other room. However the downside is that the van is now much taller and whereas once it was marginal to use some car parks, it is now out of the question for many. Another issue is that you now have a seam right around the roof of the van which may over time develop some leaks.

For this discussion, the big benefit of a High Top is that some builders added one or more mezzanine decks in this new roof space that can be used for either storage or an extra berth. The vast majority of Hiace camper vans with three berths are High Tops with a mezzanine for sleeping. The bed space is a little short being limited by the width of the van, however it is perfect for smaller people and children.
The original VW Kombi managed to fit 8 berths in a van that is smaller than a Hiace. One way they did this was to have a removable stretcher bed over the front seats. This is a very good option if you can find places to anchor the stretcher in the front. Most cabs have a great deal of glass which is useless for anchoring beds. I have seen stretcher beds used in Hiaces like this consisting of two poles and some canvas between. This would also make it easy to store. The down side though is that you have to take the time to put it in place and also it would be limited to the width of the van. Still, it is a good option for smaller people or children.
When looking for a van to buy, we did look at a Mazda e2000 that had a single spring base with mattress that hinged to the wall and was stowed up against the wall. This bed took up most of the length of the van and shared the space with storage and kitchen area. However this meant that the double bed was vastly sub standard consisting of a strange shaped lounge and cushions on the floor.
The first step in creating a new berth is to figure out the sizes required. If you are simply creating a stretcher, as we did, then you need enough room to hold a sleeping bag or some bedding in comfort. Professional camping stretchers may go as narrow as half a normal single (92cm). So a width that is somewhere from half a single (46cm) to a full single (92) will work well.

A standard single is 187cm long which is larger than the width of the van. You will need to compromise. The width of the van is just over 150cm. Even going length ways is a problem with the maximum load space of just under 3m. A 1.87m bed will take a big bite out of that space. When we made the berth for Tin Lizzy, we compromised on 80cm wide by 180 long.
With a 1.8m long single bed, we expected that it would over hang the double bed in the back by about 60cm. In addition we needed sufficient head room for our daughter to be comfortable. The rule of thumb for head room for lower bunks is 60cm. In an ideal world we would have the top of the mattress 60cm from the roof and the bottom of the bed, 60cm from the double mattress. However we just don't have the head room.
Naval ships in America were, at one stage, giving sailors 45cm distance between bunks. Finding this encouraging, We compromised on 50cm above the bed and 20cm below the bed to the double mattress. One of the reasons we chose a stretcher style bed is that they are reasonably comfortable without a mattress. This saved some valuable height since no mattress was required.
Because room was so tight we wanted to limit the structural size of the berth. I chose 30mm square section (SHS) with a wall thickness of 1.6mm. The final size was a rectangle 80x180cm. Folding this up against the wall at the right height would result in the bed forming the hypotemuse of the triangle formed by the side and roof. This would impact negatively on our head space. I decided to split the bed in half reducing the bed to a folded width of just over 40cm. This size fits flat against the wall of the van.
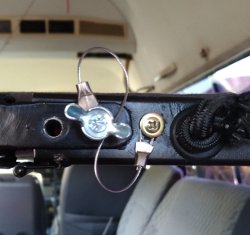
The joint that bends in the middle of the 80cm end was constructed with a small hinge on one side allowing the frame to bend. When in the straight position, two butterfly bolts at either end go through two tongues that clasp the other end of the joint and fix the joint in place. To hold the butterfly bolts I connected them to the frame with lanyards made from 1mm wire rope.

The fabric of the bed was made out of cotton canvas purchased from Spotlight. We created a tube going lengthways down the bed. Because it is double layer, it is easily strong enough for a smallish teenager.
Anchoring the bed to the wall of the van takes some consideration. Most of the area behind the bed is glass. In the end I attached a 2m length of 30mm SHS box section to two pillars and attached the bed to that using three large hinges. This worked quite well. The pillars are made of thin steel sheet and to be comfortable that the anchor is strong enough, I welded on some steel bar onto the 2m box section to make a bracket for each pillar. These were attached to the pillars using rivnuts and four M6 bolts. I have previously discussed the use of rivnuts in this article.
To support the other side of the bed, I used two wire stays. The Hiace Commuter is unusual in that it has semicircular iron reinforcing hoops that strengthen the roof in case of roll over. These are ideal to mount stays and other things. I used rivnuts to bolt on two eye plates and located another two eye plates on the edge of the murphy bed.
The stay itself was constructed from 19x3 3.2mm stainless steel rope. The benefit of rope over chain is that chain is not suitable for dynamic loads and it tends to rattle. One end of the wire stay was terminated in a forked barrel screw. The fork, designed for balustrades and boat rigging, connects to the eye on the murphy bed. The other end is terminated in a loop that has a karabiner that hooks to the eye on the roof.
To make up the wire stays you need to use a swaging tool. Swaging compresses metal onto other metal creating a cold forged weld between them. This will give you a join that is a strong as the weakest of the two metal items being swaged.
If you have a local ship's chandler or boat builder you may be able to get them to make them up for you. Alternatively you can buy a swaging tool on ebay. Your local hire store may also have them. You will want a hydraulic tool giving over 10 tons of pressure if your hardware is stainless steel.
The other difficulty in this process is cutting the wire rope. I tried bolt cutters and tin snips to no avail. The two approaches that did work were visiting Bunnings and using the wire cutters that they chained next to their rolls of wire, and my angle grinder. If using the angle grinder care needs to be taken that you cut rather than wrap the wire around the grinder. The socket for the forked barrel bolt is quite snug so you will need to ensure a clean cut to get the wire rope into the socket.
I spent some time choosing the karabiners for the stays. I could have gone to Bunnings and bought some but wouldn't have known whether they were strong enough. In the end I purchased some hammock carabiners rated at 1200kn ie they resist a static load of 1200kg. I had to purchase these from Amazon.com though but the price was right.
The final consideration is padding the bar at the head. We plan to purchase a hollow swimming noodle and use it to create a removable pad.
