


- Category: DIY
- Written by Paul Chubb
- Hits: 951
Painting some rooms

Painting is not my favorite activity, probably because I am not very good at it. This article discusses tools and paint that I used to paint three rooms: the good, the bad and the ugly.
Aldi Tools and Paints
Buying specials from Aldi is always a bit hit and miss. I have several items that are great and I use regularly. Others barely survive unwrapping. I have used most if not all the Aldi paint tools and the paint itself.
The paint comes in white and would have to be tinted to used. You can purchase colour pots from paint stores but that is extra hassle and expense. Sometimes Aldi will also sell colours to tint.
The paint itself it not of high quality. It goes on fairly chalky and shows brush and roller marks. Also, it is not very good at covering over other colours or stains. It does well as ceiling paint but not much else.
The roller covers are fairly typical cheap and nasty covers. They are good at shedding fluff onto your paint surface. The brushes are a bit better and only occasionally lose hairs.
Tools and Paint I prefer
I have just completed painting three rooms in my house. I will be continuing to paint at least another four in this round. I am not a professional painter – not even a good DIY painter. Just that new paint – even with my painting – is better than dirty and chipped walls and ceiling.
Paint

This time around I decided to use quality tools and paint. The only exception was some Aldi paint I used for the ceilings.
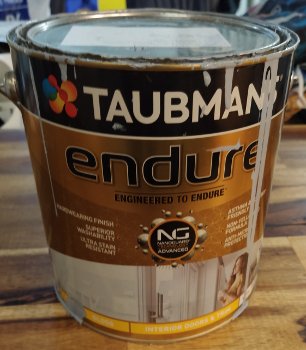
Based on Choice, I chose Taubman’s Endure for the paint. I was going to purchase a 15L can and did price benefit analysis on the brands in the Choice evaluation available at my local Bunnings. At Bunnings prices, Taubmans came out top.
I was also aware of the mandatory requirement that it be hard wearing and washable/scrubable. I may not paint these rooms ever again – getting old – and I wanted the paint to really last. Choice also tested a Dulux paint that was better but much more expensive
I used the Low sheen for the walls and the gloss for the wood work. The gloss is a little soft for skirting boards and architraves, I am hoping that it will harden over time. The wall paint covers really well and goes on fast.
Brushes
In a drywalled/Gyprocked room, you don’t use a brush much. You do the wood work with a brush and frame the walls – corners, above skirting board and below cornice – and that is about it. So I bought two brushes.
A key decision in choosing a brush is its width. This choice, in this context, is a trade off between larger size, to do more with each stroke, and smaller size, to give better control with your muscle strength and learning. Professional painters may use large brushes but they have the strength and skill to go with them.
Generally I would look at a width between 40 to 80mm. I might go smaller for more detailed painting jobs. I was hoping that my wife would help and so I chose two 63mm brushes. I reckoned that both of use should have the ability to use a brush that size.
I chose high quality DIY brushes ie good quality but not professional from Monarch which is a premium brand. These brushes have a wooden handle with a painted or coloured tip. They are called by their uses.
I bought a 63mm Walls Doors and Trims (blue tip) brush which is general purpose. You use this for room corners and for bits of wall that are too small to get a roller into. They are also useful on any wood that is either big enough or it doesn’t matter if the paint slops over.
I used this brush on the cornices slopping over onto the wall and onto the ceiling to allow meet up of paint with the roller. I also used it on architrave and window surrounds slopping onto the wall. Finally it was used for skirting boards, slopping onto the floor – the carpet was taken up – and the wall.
The other brush I purchased was a Monarch 63mm Cutting In And Framing (yellow tip) brush. This brush was a revelation. After some trial and error I was getting reasonably good lines around cornice, skirting boards and windows. We have had this house from new and I could see where the professional painter had cut in around the windows and in many cases my job was better.
One thing no one writes about is how to use this brush. The bristles are cut at an angle giving a point on one size and a shoulder at the other. For normal cutting in, I align the straight edge at the bottom of the bristles with the line I want. Cutting in, you have a surface you want paint on and one you don’t want paint on. The body of the brush lies against the surface to get paint. You bend the handle out at an angle from the to be painted surface, putting pressure on the bristles, and then drag the brush in a straight line in the direction away from the point of the brush. To get into corners you can carefully dab with the straight edge of the brush or stroke with the point.
Even with this magic brush, you will sometimes go wrong and get the paint in the wrong place. A damp rag can be used to wipe such mistakes away. Do it immediately for best results. Choose a jersey fabric such as a t-shirt or under pants.
Roller

I purchased a 270mm Razorback three piece kit. Razorback is – I think – the equivalent quality to the brushes I bought. A standard roller is 230mm. The wider roller speeds the job of painting but has the draw back of lower availability of accessories. I went to Bunnings three times before finding the pack of three covers I wanted in stock.
The roller and cover are excellent. The cover is a 12mm nap so designed for smooth surfaces like drywall/Gyprock while leaving a little bit of texture. After finishing the three rooms, the cover is ready to go again.
The tray was not so good. I like the fact that it has two slots for paint brushes however it broke very early on in the painting process. I may have trodden on it or put a ladder on it, I am not sure. I noticed the crack when cleaning it between times painting. I would suggest that you price the items separately and if the cost isn’t too much more, pass on the kit to get a sturdier roller tray.
To go with the roller, I purchased a Monarch handle. This was the cheapest at Bunnings for about $5. It was 1.2m and made of steel with a screw thread that matched the thread on the roller frame. This was just the right size for my 2.4m ceilings. However if you have high or speciality ceilings like cathedral then there are longer and extensible ones available.
The key is the thread to match the roller which is pretty standard if the frame has it at all. Monarch is pioneering a quick release system, however there are no rollers to match this system on their web site.
Speciality Tools
There are two types of roller cover cleaner – a kind of semi circular hook or blade, and a tube to go on a hose. I chose the tube.
The RotaCota Roller Cover cleaner is useless. It is a fairly simple piece of plastic and costs over $20. It includes a semi circular blade to strip paint from the roller cover back into the tin. You are then supposed to push the cover – still on the frame – into the tube and attach the hose. The water is supposed to run around the cover and through the nap removing the paint.
I found that the tube was very tight on the roller cover and the cover came out with about the same amount of paint as it went in. What is more, I found that the roller cover stuck in the tube and I had to make up a stick with a nail in it to hook the end and pull it out.
I have used paint edgers previously with mixed results. I bought one from Aldi. When they work they give a superior cut in line around things. But…
I thought my mixed results may be due to the Aldi nature of the edger I had used. This time I purchased a top of the line Shur-Line Professional Pop Off Wheel Edger. It had wheels that could lift up out of the way when loading with paint. I was sadly disappointed.
The wheel assembly on both of the tools I now have, assumes a certain height of edge to work well. My cornice and some of the facia I was going round is less than that. This means to engage the wheels, you need to tilt the edger into the face and compress the brush surface. This can lead to excess paint getting onto the face you are edging around.
Secondly, the brush pad holds a lot of paint. I have yet to find a way to remove the excess before edging – I have tried wiping it on a roller tray and also the middle of the wall. Excess paint generally ends up on the face you are edging around.
Thirdly, quite often you need to edge into a corner. For example where the skirting board meets the doorway. The side edges of the brush pad also pick up paint. This paint ends up on the other part of the corner.
Fourthly, the edger lays down a thick band of paint. You need to be sure to feather the edge of the paint band opposite the face you are edging so that it doesn’t show as a line after you have rollered the rest of the wall.
I really wanted to like this tool and so invested in the super dooper model hoping that some of the problems have gone. Yes the lift up wheels do mostly keep paint off the wheels – a problem with the fixed wheel versions - but the other issues remain. After the first room, I gave up on the Shur-Line edger and used my cutting in brush instead. It was slightly slower but resulted in about a third of the mistakes I needed to come back and fix.
The Moral

They say “a poor workman blames his tools”. My experience from these three rooms is that good tools can certainly improve a mediocre workman.
The main benefits of the expensive paint I saw were its ability to cover colours and stains and also the finish. I am waiting to see how well it stands up to time – the other promised benefit.
The wall brush was just a good quality brush – no shedding bristles. The cut-in brush allowed even me to produce reasonable cut in lines.
The roller and roller cover did their jobs well, shed very little fluff and are still going strong after three rooms.
The speciality items I bought and the first roller tray were disappointing to say the least.
